

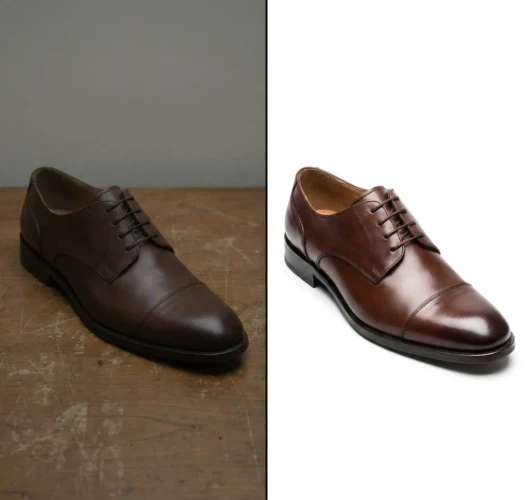
What Brightness and Contrast Adjustment Can Do for Your Product
High-quality product photos are important to grab customer attention. Sometimes, even good photos can look dull or flat due to lighting issues. Brightness and contrast adjustment can quickly fix this problem. By improving light and dark areas, your product becomes clearer and more appealing. Colors appear livelier, and small details are easier to see. These simple edits make your images look professional and ready for online stores, catalogs, or social media.
Adjusting brightness and contrast also helps your products stand out in a crowded marketplace. Correctly balanced photos give a sense of realism that draws viewers’ eyes. They prevent images from looking washed out or overly dark. With a little care, brightness and contrast editing can improve the overall quality of your visuals and increase engagement. Ultimately, this technique helps your products look their best and encourages shoppers to buy.
Why Brightness and Contrast Adjustment Boosts Your Sales?
It is one of the simplest ways to improve your product photos or content images. Brightness controls how light or dark your image appears, while contrast affects the difference between the darkest and lightest areas. Together, they make photos look clearer, sharper, and more visually appealing. Proper adjustment can highlight details that might otherwise get lost and make colors appear more engaging. This is especially useful for e-commerce photos, social media content, or any visuals where you want your product or subject to stand out. Even small tweaks can have a big impact on the overall quality of your image. Using brightness and contrast adjustments also helps create consistency across multiple images.
When all your photos have similar lighting and tone, your brand looks more professional and organized. It can fix minor exposure issues and bring out textures in images. However, it’s important not to overdo it, too much brightness can wash out details, and too much contrast can make shadows too harsh. By making careful adjustments, you can make your images more engaging and natural-looking. And if you want consistent results without the extra effort, you can explore our professional editing services or view our portfolio to see how we enhance images for real brands.
Tips for effective brightness and contrast adjustment:
- Increase brightness for darker images but keep details visible
- Adjust contrast to make textures and edges stand out
- Avoid over-brightening or over-contrasting to keep the image natural
- Compare before and after to see the difference
- Apply similar settings to multiple images for a consistent look
Show Off True Colors and Details Using Brightness and Contrast Adjustment
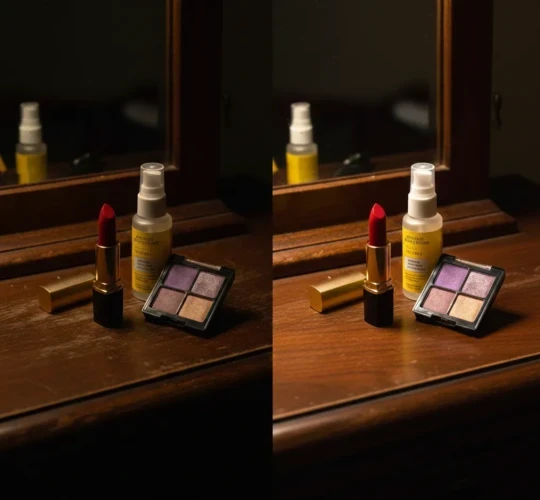
Brightness and contrast adjustment is one of the easiest ways to make your images look sharper, more vibrant, and professional. Brightness controls how light or dark your photo appears, while contrast adjusts the difference between the shadows and highlights. Using both carefully can help your products or content stand out by showing off true colors and bringing out hidden details. Even small tweaks can make textures pop, colors richer, and edges cleaner. This is especially helpful for product photos, social media posts, or any visuals that need to grab attention. Proper adjustments make your images look natural while still polished. Consistency is another big benefit of brightness and contrast adjustment.
Matching brightness and contrast across multiple images keep your visuals cohesive and professional-looking. It also helps fix minor exposure issues, balance lighting, and enhance depth. The key is not to overdo it, too much brightness can wash out details, and too much contrast can make shadows harsh. When done right, these adjustments make images more engaging and visually appealing.
Fix Common Problems with Brightness and Contrast Adjustment

Many photos have small problems like being too dark, too bright, or lacking detail, and brightness and contrast adjustments can fix these issues quickly. Brightness lets you lighten or darken an image, while contrast adjusts how sharp the difference is between highlights and shadows. Together, they can bring out details that were hidden, make colors more accurate, and give your photos a cleaner, more polished look. This is especially useful for product photos, lifestyle shots, or content you plan to post online. Even small tweaks can make a big difference in making your images look professional and appealing. Adjusting brightness and contrast also helps improve consistency across multiple images.
If your photos are part of a catalog or social media feed, keeping a similar brightness and contrast level creates a cohesive look. It can fix underexposed or overexposed shots, enhance textures, and make your subjects stand out. The key is to make adjustments gradually and check the results, so your photos remain natural and not over-edited. With careful brightness and contrast correction, even common photo problems can be easily solved.
Tips for fixing common photo issues:
- Brighten dark photos to reveal hidden details
- Adjust contrast to make colors and edges pop
- Avoid over-brightening or over-contrasting
- Check consistency across multiple images
- Compare before and after to make natural results
Perfect for Online Stores and Social Media

Bright, clear images are key for catching attention online, if it’s an e-commerce store or social media. Photos with proper brightness and contrast make products look real, detailed, and appealing, helping shoppers or followers understand exactly what they’re seeing. Consistent and polished visuals also make your store or feed look professional and trustworthy. Even small improvements in lighting and tone can make a big difference in how your content is perceived. This makes your products stand out from the competition and encourages people to engage with your posts. Using tools like brightness and contrast adjustment keeps your photos cohesive across multiple posts or listings.
It helps fix common problems like dull colors or washed-out details without making images look over-edited. Clear, vibrant images also perform better on marketplaces, websites, and social platforms since they draw attention quickly. Overall, taking a little time to edit photos properly can boost clicks, likes, and sales.
Tips for online-ready photos:
- Keep colors natural and accurate
- Make sure brightness is balanced, not too harsh
- Adjust contrast to highlight details
- Use similar settings for multiple photos for a clean look
- Check images on mobile and desktop to see how they display
Quick Tips for Using Brightness and Contrast Adjustment
Brightness controls how light or dark an image appears, while contrast adjusts the difference between shadows and highlights. Using these tools carefully can make colors pop, reveal hidden details, and give your photos a natural, polished look. They’re perfect for product photos, social media posts, or any images you want to stand out. Even small changes can make a noticeable difference in the overall quality of your photos.
The key to great results is subtle, balanced adjustments. Overdoing brightness can wash out details, and too much contrast can make shadows harsh. It’s also important to keep settings consistent across multiple images so your photos look cohesive. By taking a few extra moments to tweak brightness and contrast, you can dramatically improve how your content looks and engages viewers.
Conclusion
Brightness and contrast adjustments might seem small, but they can completely change your photos, clear details, and products look professional. Even a few careful tweaks can turn flat images into visuals that grab attention online. Have you tried adjusting lightings and contrast for your product photos or social media content? We’d love to hear what works for you! Share your tips, experiences, or even struggles in the comments below let’s help each other make our images look their best. Want to see the difference professional edits can make? Check out our portfolio or explore our services today!
Read Next: Online Photo Editor vs. Professional Services: Which One to Choose?