

Image Upscaler Tools That Turn Low-Quality Photos to Print-Ready
We all know how frustrating it is when a photo you love turns out blurry or low-quality. Be it a cherished memory, a product shot for your store, or a creative project, a blurry image can ruin the whole vibe. That’s where image upscaler tools come in. These handy tools use smart technology to improve the quality of your photos in just a few clicks. Suddenly, even old or small images can look sharp, detailed, and ready for printing. It’s like giving your pictures a makeover without needing any fancy skills.
The best part is how simple it is to use these tools. You don’t have to struggle with complicated software or spend hours trying to fix tiny details. Image upscalers automatically enhance colors, remove fuzziness, and bring out details you didn’t even notice before. They’re perfect for anyone who wants high-quality results for personal keepsakes or professional use. With just a few minutes, your low-quality photos can become crisp, print-ready images that look amazing anywhere. If you’ve ever wished your old pictures could shine again, this is the solution you’ve been waiting for.
How Image Upscaler Makes Old Photos Look New
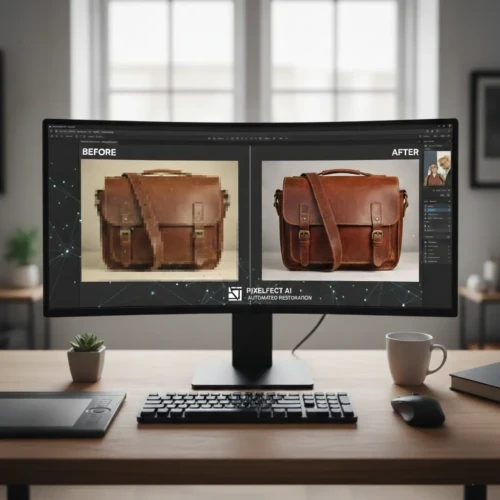
Image upscaler tools are a game-changer for bringing old or low-resolution photos back to life. They use smart technology to increase the size of your image without losing details, making blurry or pixelated pictures look sharper and cleaner. This is perfect if you want to preserve memories, improve product images, or prepare photos for printing. Instead of struggling with complicated editing software, an upscaler does most of the work automatically, saving you time and effort. Even small details like textures, edges, or fine lines get enhanced, so your photos look much more professional and polished.
Besides improving clarity, image upscalers can also help with color correction and noise reduction, making your photos appear brighter and more vibrant. They’re especially useful for restoring old family pictures, outdated marketing images, or low-quality downloads. To get the best results, here are some simple tips.
- The clearer the original, the better the result.
- Sometimes too much upscaling can make images look unnatural.
- Some upscalers specialize in portraits, while others work best with products or landscapes.
- Adjust the size based on where the photo will appear.
- Always keep a backup of the original photo in case you need it later.
Why You Should Use an Image Upscaler
Using an image upscaler can make a big difference if you want your photos to look sharp and professional. Low-resolution images often appear blurry or pixelated, which can turn off viewers even if it’s for an online store, social media, or personal projects. An upscaler automatically improves the clarity, sharpness, and details of your photos, so they look high-quality without hours of editing. It’s a simple way to make your images look polished and more appealing, even if the original file wasn’t perfect. It can also improve colors and prepare photos for printing or online use. They save time, make your content look professional, and help you get better results with minimal effort.
Here are a few tips to get the most out of them.
- Some work better for portraits, others for products or landscapes.
- Compare results to make sure the upscaler didn’t overdo the details.
- The better the starting image, the better the outcome.
- Don’t make images too large for your platform.
- Always save the original file in case you want to try a different upscaling tool.
When Is the Best Time to Use It

Knowing when to use an image upscaler can make a big difference in getting the best results. It’s most useful when your original photo is low-resolution, blurry, or too small for the way you want to use it. For example, if you’re preparing images for printing, social media, or an online store, upscaling can make them look crisp and professional. It’s also great for restoring old photos or digital downloads that don’t have high quality. Using an upscaler at the right time saves you time from hours of manual editing while giving your images a fresh, polished look.
Another great time to use an image upscaler is when you’re repurposing content. Maybe you have older images from past campaigns, blog posts, or product listings that need a refresh for new platforms. Instead of taking new photos, upscaling can bring those images up to modern standards, saving time and money. It’s also useful when you need to match different images in a set like creating a consistent look across a website or social media feed. By upscaling at the right moment, you can keep your visuals looking professional, cohesive, and ready for any project.
Make Your Photos Ready for Printing with Image Upscaler
When you want to print your photos, quality matters more than ever. Using an image upscaler can boost the resolution, sharpen details, and improve colors so your photos come out crisp, clear, and concise. This works for anything from posters and flyers to photo albums or product catalogs. By upscaling first, you save yourself the hassle of trying to manually fix every photo before printing, and your images look professional every time.
Another helpful tip is to consider the size of your final print. Upscaling allows you to enlarge images without losing quality, so even small digital photos can become large posters or banners. It’s also a good idea to test-print one copy first to make sure colors, sharpness, and details look just right. By planning ahead and using an upscaler, you can avoid wasted prints and ensure every photo comes out looking professional and polished.
Perfect for Personal and Professional Projects
Image upscalers are great for both personal and professional projects because they can instantly improve the quality of any photo. For personal use, they can restore old family pictures, brighten vacation shots, or sharpen everyday snapshots so memories look vivid and clear. You can even use them to create high-quality prints, photo albums, or social media posts that really stand out. The tool works automatically, so you don’t need advanced editing skills to get professional-looking results. Even small improvements, like improving details can make a huge difference in how your photos appear. For professional projects, upscalers are perfect for businesses, marketers, or content creators who rely on high-quality visuals. They can turn low-resolution product photos, presentation slides, or marketing images into polished, detailed visuals that reflect your brand’s professionalism.
Using an upscaler saves time compared to manual editing while keeping your visuals consistent and sharp. To get the best results, here are a few tips:
- Start with the best original image you have for clearer results.
- Check details after upscaling to ensure edges and textures look natural.
- Use for prints or online use depending on your project needs.
- Keep a backup of your original files in case you want to make changes.
- Pick the right tool for the type of image portraits, products, or landscapes.
Tips to Get the Best Results
Getting the most out of an image upscaler is easier than you think, but a few simple tricks can make a big difference. The quality of your original photo matters a clearer starting image usually gives the best results. It’s also important to choose the right tool for your specific needs, whether you’re working with portraits, product photos, or landscapes. After upscaling, take a close look at details like edges, textures, and colors to make sure everything looks natural and sharp. Using these tips can help your images look polished and professional without spending hours editing. Check out our professional image editing services and let our team help make your images crisp, detailed, and print-ready.
Here are some practical tips to keep in mind:
- Use the highest-quality original you have to get sharper results.
- Zoom in and check details after upscaling to catch any imperfections.
- Adjust colors or brightness if needed to make images look more vibrant.
- Save your originals separately in case you want to try a different upscaling method.
- Test small batches first if you’re processing many images at once.
Conclusion
Using an image upscaler is an easy way to bring old, blurry, or low-quality photos back to life without spending hours editing. It can make your memories, product images, or creative projects look sharp and ready for printing or sharing online. Even small improvements can make a big difference in how your photos stand out and feel professional. The best part is anyone can do it no fancy skills required. Have you ever tried upscaling your old photos or product images? Drop a comment below and share your experience or let us know which type of photos you’d like to improve first!
Read Next: What Brightness and Contrast Adjustment Can Do for Your Product